Saturday, June 29, 2013


Tableau 8.0
Tableau is data BI visualization software, This will be useful to understand business with simple clicks. Any one can use Tableau who doesn’t have knowledge on any other BI Tools. Here it doesn’t required any Data Modeling. Here we are not having any Administration tool like in OBIEE to do Data modeling and other stuffs .

1.       work directly from database

2.       It doesn’t required to pull data into a silo

3.        manage your own data connection and metadata

4.        we can connect directly to databases, cubes, data warehouses, files and spreadsheets

Tableau installation on Desktop
Simple steps to Install Tableau in desktop. With the below link we will get free trial version of TableauDesktop.exe file. Tableau is providing 14days of free tail.

Step 1:
Use the below link to download
http://www.tableausoftware.com/products/desktop/download?os=windows

Step 2:
1.       Double click on TableauDesktop.exe file then we will get the below screen


2.  check in the check box “I have read and accept the terms of this License Agreement” and Click on “Install” button then It will ask you to install software in your desktop then say “YES”. After completion of installation you will get the below screen


3. Click on “Start Trail now” then it will ask you to register. Give  the details and click Register button.


Then you will get the below screen Says “Registration completed”. Click on “Continue” and use this tool with the period of 14days.

Tableau Home page look likes below screen

Friday, June 28, 2013


How to deploy RPD in OBIEE11g

Step I:

Go to  Enterprise Manager and left side pane click on Coreapplication in Business Intelligence.

Step II:

Click Lock and Edit Configuration -> Deployment -> Repository then select the Repository and give the username and password and click Apply

Step III:

Click Active Changes then click Restart to apply recent changes
Finally click Restart


Step I:


Go to http://hostname:7001/em/ then click Coreapplication in Business Intelligence.

Step II:


1.       Click Lock and Edit Configuration


Then we will get the below screen

 
2.       Then we will get the below window that says Click Lock and Edit Configuration is completed successfully

Click Deployment -> Repository


3.       Select the Repository using Update button and give the username and password of the Repository then click Apply


4.       Select the Repository using Update button and give the username and password of the Repository then click Apply


5.       Then the Repository will appear in Default RPD


Step III:


1.       Click on Active Changes


Then we will get the below screen


2.       Click Restart to apply recent changes
 
3.       Finally click Restart


Then we will get the below screen

4.       The Click on yes to restart all BI components then we will get completed successfully window.


Thursday, June 27, 2013


How to deploy RPD in OBIEE10g

Step 1: Change the Repository name in NQSConfig.ini file and save it

Step 2:  Go to Instanceconfig.xml file and change the catalog name and save it

Step 3: Restart BI Server and Presentation Servers

Step 1:
Go to BIHOME\OracleBI\server\Config path and open NQSConfig. Ini file and change the repository name


Step 2:
Go to BIHOME\OracleBIData\web\config path and open Instanceconfig.xml file and change the catalog name


Step 3:
Restart BI Server and Presentation Servers


Wednesday, June 26, 2013


How to use presentation variable in OBIEE?

Statement: Here we are going to use presentation variable in Narrative view

I.        Create a presentation variable using Dashboard prompt

II.      Use presentation variable name in report

III.    Add Prompt and Report in Dashboard

Step I:


1.       Create new dashboard prompt using New->Dashboard prompt


2.       Select the Subject Area

Then we can able to view the below page


3.       Click “+” Symbol and select “Column Prompt”
 
 
4.       Select the Column which need for presentation Variable. Suppose here we are selecting CALENDAR_YEAR from Times table


Then we will get the below screen
 
 
5.       Select the Set Variable as “Presentation Variable”  and then give the name of presentation variable
Here we are giving the name “CAL_YEAR_PRE_VAR
 
 
 Then save the Prompt

Step II:  

1.       Create new Report using New-> Analysis and Add the filter with Prompt formula and select Operator as “IS PROMPTED”
 

Results of the report


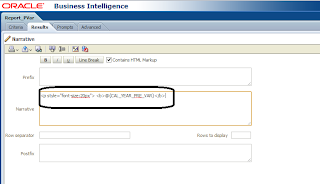
2.       Here we are using the Presentation Variable in “Narrative view”


3.       Call Presentation variable “CAL_YEAR_PRE_VAR” in Narrative view as shown in below screen
Presentation Variable Syntax is “@{CAL_YEAR_PRE_VAR}”
 
Save the report

Step III:

1.       Create new Dashboard page and add Dashboard Prompt and Report


              Save the Page and run the dashboard page


2.       Select any of the option in prompt